How GA Connector Integration works
At its core, GA Connector is a piece of JavaScript code (that talks to our server), which creates tracking cookies, which can be sent to your CRM system.
When your users come to your website, gaconnector.js creates the following cookies based on UTM parameters, HTTP referrer and other information:
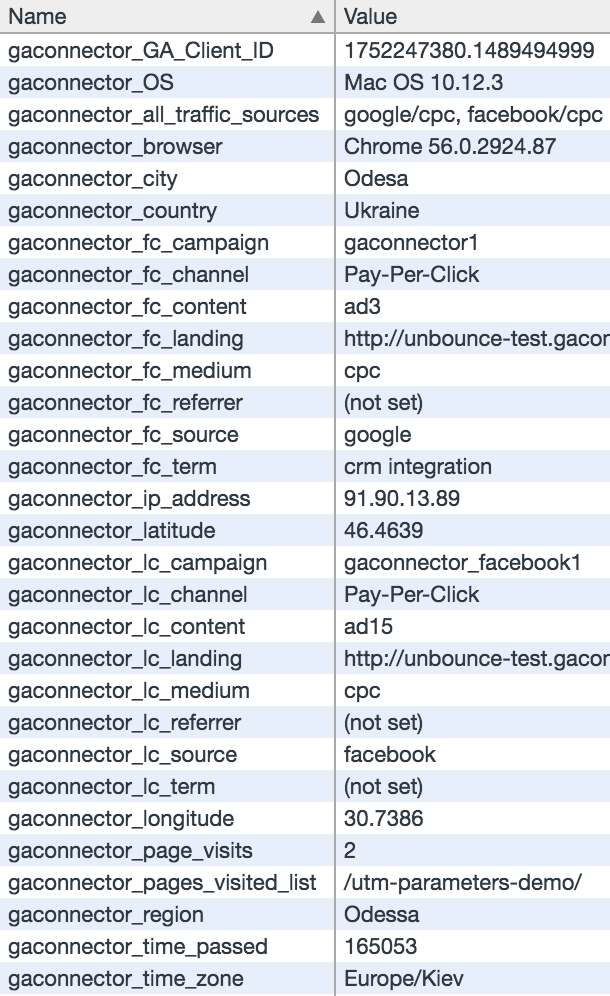
Then, during form submission, these tracking cookies can be sent to your CRM, alongside the information you’re already sending to the CRM (users’ names, phones, emails etc).
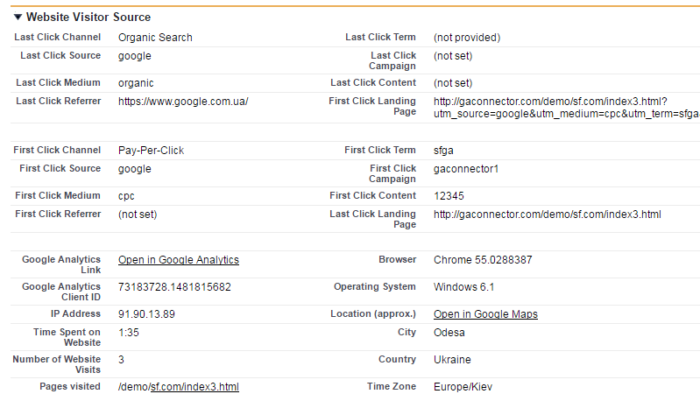
The values of these tracking cookies can then be placed in custom CRM fields like this:
Installation
1. Install GA Connector tracking code on the website
To start tracking, please put this script on your website:
|
1 2 3 4 5 6 7 8 9 10 11 12 13 14 15 16 17 18 19 20 21 22 23 |
<script data-cfasync="false" type="text/javascript" src="https://tracker.gaconnector.com/gaconnector.js"></script> <script> function setGaconnectorHiddenFields() { var gaFields = gaconnector.getCookieValues(); for (var fieldName in gaFields) { var selectors = 'form input[name="' + fieldName + '"], form input#' + fieldName + ', form input#field_' + fieldName + ', form input[name="' + fieldName.toLowerCase() + '"], form input#' + fieldName.toLowerCase() + ', form input#field_' + fieldName.toLowerCase() + ', input[value="gaconnector_' + fieldName + '"],'; selectors += 'form textarea[name="'+fieldName+'"], form textarea#'+fieldName+', form textarea#field_'+fieldName + ', form textarea[name="'+fieldName.toLowerCase()+'"], form textarea#'+fieldName.toLowerCase()+', form textarea#field_'+fieldName.toLowerCase()+', form textarea.'+fieldName+', form textarea[name="param['+fieldName+']"]'+", form textarea[id^='field_"+fieldName+"']"; var inputs = document.querySelectorAll(selectors); if (inputs === null) { continue; } else if (typeof inputs.length === 'undefined') { inputs.value = gaFields[fieldName]; } else { for (var i = 0; i < inputs.length; i++) { inputs[i].value = gaFields[fieldName]; } } } } gaconnector.setCallback(setGaconnectorHiddenFields); setInterval(setGaconnectorHiddenFields, 1000); </script> |
Requirements:
- This code should ideally be put in the very beginning of the <body> tag, or in the <head>. If it’s put in the middle or at the end of <body>, some visitors who don’t wait until the whole page loads, won’t be tracked correctly.
- The code needs to be put on every page of the website, or at least on every page that can potentially the first one that user opens on the website.
-
If you are using cookie consent banner in your website, make sure to follow the steps outlined here.
Alternatives:
- If you use WordPress, just install our plugin – it will automatically put GA Connector tracking code on every page page of the site in the right place.
- If you use Google Tag Manager, use this instruction to add GA Connector tracking code.
Keep in mind that before we add your domain(s) to our system, you’ll get something like “Free Trial expired” instead of real tracking information.
2. Create custom fields in the CRM for the GA Connector fields you want to track.
The purpose of these fields is to store the tracking information gathered by gaconnector.js.
Here is how you can add them to your CRM:
- If you’re using Salesforce, just install our package that will automatically add these custom fields for you.
- If you’re using Zoho CRM, just install our extension that will automatically add these custom fields for you.
- If you’re using a different CRM, you’ll need to create these fields manually. But keep in mind that you don’t necessarily need to create each of the above fields in your CRM, only the ones you plan on using. Here is the list of fields you can create:
| Label | Input ID | Label | Input ID |
|---|---|---|---|
| All Traffic Sources | all_traffic_sources | Last Click Campaign | lc_campaign |
| Browser | browser | Last Click Channel | lc_channel |
| City (from IP address) | city | Last Click Content | lc_content |
| Country (from IP address) | country | Last Click Landing Page | lc_landing |
| First Click Campaign | fc_campaign | Last Click Medium | lc_medium |
| First Click Channel | fc_channel | Last Click Referrer | lc_referrer |
| First Click Content | fc_content | Last Click Source | lc_source |
| First Click Landing Page | fc_landing | Last Click Term | lc_term |
| First Click Medium | fc_medium | Last Click Timestamp | lc_timestamp |
| First Click Referrer | fc_referrer | Longitude | longitude |
| First Click Source | fc_source | Latitude | latitude |
| First Click Term | fc_term | Number of Website Visits | page_visits |
| First Click Timestamp | fc_timestamp | Operating System | OS |
| Google Analytics CID | GA_Client_ID | Device | device |
| Google Analytics Measurement ID | GA_Measurement_ID | Region | region |
| Google Analytics Session ID | GA_Session_ID | Pages Visited | pages_visited_list |
| Google Click Identifier | gclid | Time Spent on Website | time_passed |
| IP Address | ip_address | Time Zone | time_zone |
3. Modify your forms to send GA Connector tracking info alongside form submissions
Here are the guides for integrating the forms that are the most popular among the clients of GA Connector:
-
- Salesforce Web-to-Lead forms
- Zoho CRM Webforms
- Zoho Forms
- Zoho SalesIQ
- Zoho Booking
- Contact Form 7 for WordPress
- Gravity forms for WordPress
- Ninja Forms for WordPress
- Unbounce
- Hubspot forms
- Pardot
- LiveChat
- Intercom
- Mailchimp forms
- Calendly
- Freshworks CRM (formerly Freshsales) Smart forms
- Freshworks CRM (formerly Freshsales) Classic forms
- Agile CRM
- FormStack
- HighLevel
- Jotform
- CrispChat
- Acuity Scheduling
- Wisepops
If you use a different kind of forms, please refer to this instruction. But first, please check if your forms are compatible with GA Connector.
You can also push GA Connector data to GTM data layer.
4. Map hidden form fields to CRM fields.
- Skip this step if you’re using native CRM lead forms.
- If your forms are not connected to your CRM, you need to do that first.
Our script will save GA data to the form hidden fields. But these fields need to be mapped to the corresponding CRM fields in order to appear in your CRM.
The mapping process depends on how your forms are connected to your CRM
- If you’re using third-party forms with a CRM add-on that sends hidden field’s data to CRM custom fields: Go to the add-on mapping settings and connect new fields you’ve added in step 3.
- If you’re using Zapier to connect your forms with CRM: head to your form Zap settings and map the new form fields to the corresponding CRM fields.
- If you’re using custom code to send form data: update the code to send GA fields in addition to existing fields.
5. Add UTM parameters to your PPC sources (optional)
This way, you’ll get more information about leads coming through these sources.
If you use Google Adwords, please complete this tutorial (it shows how to add UTM parameters to all ads quickly & effortlessly).
For other PPC sources, check out the UTM builder.
6. Create reports and dashboards to display the information collected by GA Connector (optional)
7. Make your website HTTPS if you haven’t yet (optional)
The thing is, when a user goes from an HTTPS website to an HTTP one, most browsers hide the referrer information from the HTTP site.
This doesn’t allow Google Analytics and GA Connector to track the source of such user (unless there are UTM parameters).
So if your website is still HTTP, and your user is coming from some HTTPS blog for example, GA Connector (and Google Analytics) will consider this user’s traffic source direct/none.
You can read more about this and other tracking details here.

