The instructions below apply to Cookie-Based integration.
If you are using API-Based integration, please note that Calendly Forms does not support it. You will need to follow the Cookie-Based integration steps instead.
Not sure which instructions to follow? Start here: How to Check Which GA Connector Integration Type You’re Using.
Unfortunately, Calendly only allows the following parameters to be passed into their forms
- Campaign
- Source
- Medium
- Content
- Term
GA Connector will be able to pass the “Last Click” values of the mentioned fields to your Calendly Leads.
Prerequisites
- Installed either GA Connector WordPress plugin or GA Connector script on your website:
- GA Connector script must be loaded before your Calendly form. Putting the GA Connector script on the <head> of your website would work.
|
1 2 3 4 5 6 7 8 9 10 11 12 13 14 15 16 17 18 19 20 21 22 23 |
<script data-cfasync="false" type="text/javascript" src="https://tracker.gaconnector.com/gaconnector.js"></script> <script> function setGaconnectorHiddenFields() { var gaFields = gaconnector.getCookieValues(); for (var fieldName in gaFields) { var selectors = 'form input[name="' + fieldName + '"], form input#' + fieldName + ', form input#field_' + fieldName + ', form input[name="' + fieldName.toLowerCase() + '"], form input#' + fieldName.toLowerCase() + ', form input#field_' + fieldName.toLowerCase() + ', input[value="gaconnector_' + fieldName + '"],'; selectors += 'form textarea[name="'+fieldName+'"], form textarea#'+fieldName+', form textarea#field_'+fieldName + ', form textarea[name="'+fieldName.toLowerCase()+'"], form textarea#'+fieldName.toLowerCase()+', form textarea#field_'+fieldName.toLowerCase()+', form textarea.'+fieldName+', form textarea[name="param['+fieldName+']"]'+", form textarea[id^='field_"+fieldName+"']"; var inputs = document.querySelectorAll(selectors); if (inputs === null) { continue; } else if (typeof inputs.length === 'undefined') { inputs.value = gaFields[fieldName]; } else { for (var i = 0; i < inputs.length; i++) { inputs[i].value = gaFields[fieldName]; } } } } gaconnector.setCallback(setGaconnectorHiddenFields); setInterval(setGaconnectorHiddenFields, 1000); </script> |
Set up Calendly Form using Developer embed code
In order to pass GA Connector information to Calendly, you must embed your Calendly form in your website using the developer embed option.
Instead of using the default embed code, use the code below to embed your form in your website (change the value of the URL property on line 9 with the URL of your form, e.g. url: ‘https://calendly.com/company-name/form-name” )
|
1 2 3 4 5 6 7 8 9 10 11 12 13 14 15 16 17 18 19 20 21 22 23 24 25 26 27 28 29 30 31 32 33 |
<!-- Calendly inline widget begin --> <div class="calendly-inline-widget" style="min-width: 340px; height: 900px;" data-auto-load="false"> <script type="text/javascript" src="https://assets.calendly.com/assets/external/widget.js"></script> <script> (function() { var gaFields; function initWidget() { Calendly.initInlineWidget({ url: 'url-of-your-calendly-form', parentElement: document.querySelector('.calendly-inline-widget'), utm: { utmCampaign: gaFields.lc_campaign, utmSource: gaFields.lc_source, utmMedium: gaFields.lc_medium, utmContent: gaFields.lc_content, utmTerm: gaFields.lc_term } }); } function checkGaconnector() { gaFields = gaconnector.getCookieValues(); return !!gaFields.lc_source; } var interval = setInterval(function() { if(checkGaconnector()) { initWidget(); clearInterval(interval); } }, 1000); })(); </script> </div> <!-- Calendly inline widget end --> |
For more information regarding using Advanced embed codes in Calendly, please see this article.
After adding setting up the code above, your Calendly leads should now contain tracking information from GA Connector.
Passing GA Connector information to your Calendly form via hyperlink
If you are using Calendly links instead of embedding them in your website, you can still pass GA Connector to them. Just add the following code at the bottom of your website near the closing </body> tag
|
1 2 3 4 5 6 7 8 9 10 11 12 13 14 15 16 17 18 19 20 21 22 23 24 25 26 27 28 29 30 31 32 33 34 35 36 37 38 39 40 41 42 |
<script> var els = document.querySelectorAll("a[href^='https://calendly.com']"); var gaFields; function checkGaconnector() { gaFields = gaconnector.getCookieValues(); return !!gaFields.lc_source } function toQueryString(obj) { var str = []; for (var p in obj) { if (obj.hasOwnProperty(p)) { str.push(encodeURIComponent(p) + "=" + encodeURIComponent(obj[p])); } } return str.join("&"); } var interval = setInterval(function() { if (checkGaconnector()) { var searchParametersData = { 'utm_campaign': gaFields.lc_campaign, 'utm_source': gaFields.lc_source, 'utm_medium': gaFields.lc_medium, 'utm_content': gaFields.lc_content, 'utm_term': gaFields.lc_term } for (var i = 0, l = els.length; i < l; i++) { var el = els[i]; el.href = el.href + '?' + toQueryString(searchParametersData); } clearInterval(interval); } }, 1000); </script> |
This code searches for Calendly <a> tags on your website and appends them with GA Connector information.
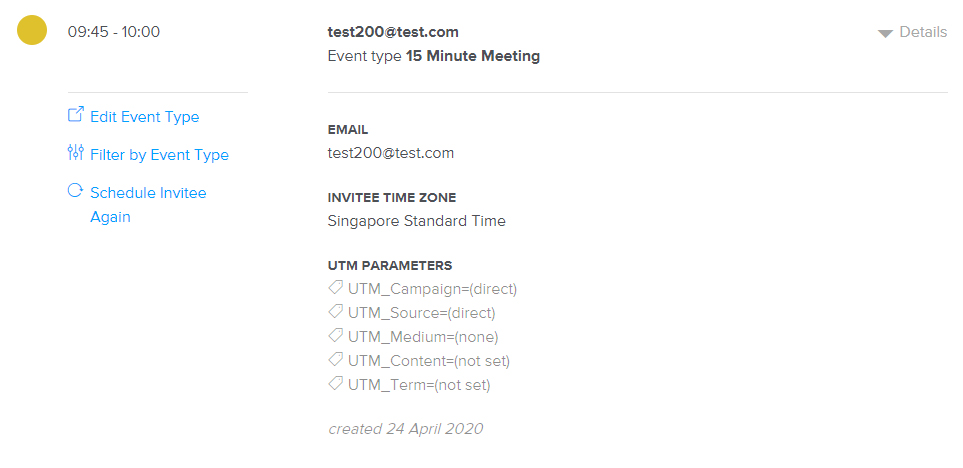
Checking your integration
To verify that your GA Connector to Calendly Form integration is working,
- Complete a test submission on your Calendly form
- Check if GA Connection information is passed by looking in your Calendly Dashboard (My Calendly > Scheduled Events > Created Event)
- On the Created event, it should contain UTM information similar to the screenshot below.