The instructions below apply to Cookie-Based integration.
If you are using API-Based integration, please note that Acuity Scheduling does not support it. You will need to follow the Cookie-Based integration steps instead.
Not sure which instructions to follow? Start here: How to Check Which GA Connector Integration Type You’re Using.
Add Google Analytics data to Acuity Scheduling with GA Connector’s Acuity Scheduling integration.
Prerequisites
- Installed either the GA Connector WordPress plugin or GA Connector script on your website
Create GA Connector fields in Acuity Scheduling
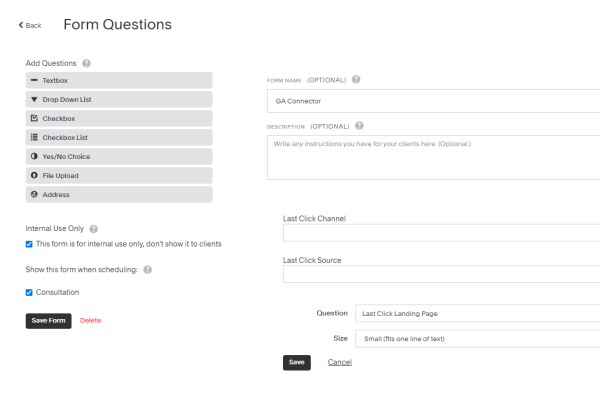
- On your Acuity dashboard go to Intake Form Questions and create a New Custom Form
- Check the option “Internal Use Only”
- Add a textbox for each GA Connector field that you want to track. For a full list of GA Connector fields that you can add, please see this article. Take note of the GA Connector Input ID of each field that you add because we’ll be needing these IDs later in the next step.

Build custom script for your form
- Modify the code below and change the fieldMapping variable so that the key-value pair is the GA Connector input and the Field ID of the field that you have created. (You can find out how to get the field ID of the custom fields on the instructions below this one)
12345678<script>var fieldMapping = {gaconnector_input_id: 'field:xxxx',gaconnector_input_id: 'field:xxxx',gaconnector_input_id: 'field:xxxx',}function checkGaconnector(){return gaFields=gaconnector.getCookieValues(),!!gaFields.lc_source;}function updateAcuitySrc(){var URLarr=new Object();var aCuityIframes=document.querySelectorAll('iframe[src*="squarespacescheduling"]');for(var gaName in fieldMapping)URLarr[fieldMapping[gaName]]=gaFields[gaName];var URLparams=new URLSearchParams(URLarr).toString();if(aCuityIframes===null)return;else if(aCuityIframes.length===void 0){var separator=aCuityIframes.src.indexOf('?')>-1?'&':'?';var newSrc=aCuityIframes.src+separator+URLparams;aCuityIframes.src=newSrc;}else for(var i=0;i<aCuityIframes.length;i++){var separator=aCuityIframes[i].src.indexOf('?')>-1?'&':'?';var newSrc=aCuityIframes[i].src+separator+URLparams;aCuityIframes[i].src=newSrc;}}var gaFields;var interval=setInterval(function(){checkGaconnector()&&(updateAcuitySrc(),clearInterval(interval));},100);</script>
Example: You have added: Last Click Channel, Last Click Source, and Last Click Landing Page on your form. The fieldMapping value should be:
12345var fieldMapping = {lc_channel: 'field:1234',lc_source: 'field:2345',lc_landing: 'field:5689',} - Install the whole code on your website, this must be placed right after your Acuity Scheduling embed code.
How to Get the Field ID of the Custom Fields
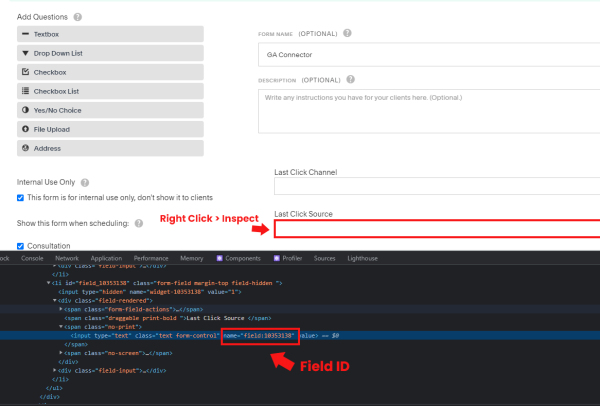
- After creating GA Connector textboxes on your custom form, right-click on the created text box and select Inspect. The field ID is the value of the name attribute which usually starts with “field:”. (See Image below)

After adding the code to your website, submissions to your Acuity Scheduling form should now contain tracking information, you can check this on either the notification email that Acuity Scheduling will send or on the Acuity Scheduling dashboard.
More than just UTM parameters
GA Connector adds UTM information, geolocation, referral information to your Acuity Scheduling leads.
See below for all the information that you can add to your leads to help you find out which of your marketing activities drive sales.
| Label | Input ID | Label | Input ID |
|---|---|---|---|
| All Traffic Sources | all_traffic_sources | Last Click Campaign | lc_campaign |
| Browser | browser | Last Click Channel | lc_channel |
| City (from IP address) | city | Last Click Content | lc_content |
| Country (from IP address) | country | Last Click Landing Page | lc_landing |
| First Click Campaign | fc_campaign | Last Click Medium | lc_medium |
| First Click Channel | fc_channel | Last Click Referrer | lc_referrer |
| First Click Content | fc_content | Last Click Source | lc_source |
| First Click Landing Page | fc_landing | Last Click Term | lc_term |
| First Click Medium | fc_medium | Last Click Timestamp | lc_timestamp |
| First Click Referrer | fc_referrer | Longitude | longitude |
| First Click Source | fc_source | Latitude | latitude |
| First Click Term | fc_term | Number of Website Visits | page_visits |
| First Click Timestamp | fc_timestamp | Operating System | OS |
| Google Analytics CID | GA_Client_ID | Device | device |
| Google Analytics Measurement ID | GA_Measurement_ID | Region | region |
| Google Analytics Session ID | GA_Session_ID | Pages Visited | pages_visited_list |
| Google Click Identifier | gclid | Time Spent on Website | time_passed |
| IP Address | ip_address | Time Zone | time_zone |

