Google AdWords and Salesforce integration is imperative for digital marketers with significant ad spend. When you link two, all your conversion data will be located in one place. As a digital marketer or PPC agency, you will be able to:
- Determine if the AdWords marketing channel generates a positive ROI for you.
- Track which of your AdWords campaigns are most effective.
- Effectively manage ads through informed decisions about ad groups and keywords
- Learn which campaigns actually result in Salesforce leads and opportunities.
When integrated, the relationship between AdWords and Salesforce works through a special cookie called GCLID (Google Click ID). The cookie can be used to accredit offline Salesforce conversions to an ad group or keyword. In this article, we will show how you can access these powerful insights through AdWords conversion tracking in conjunction with Salesforce.
Why You Should Implement AdWords Conversion Tracking with Salesforce?
Synchronize Sales and Marketing Data
When you integrate Google Ads and Salesforce, critical insights about leads, contacts and opportunities will seamlessly pass between the two platforms. As a result, you will significantly increase data quality and marketing campaign effectiveness.
Additionally, by linking Google AdWords and Salesforce, you can send all this powerful data to Google Analytics as well. This will help you understand exactly how much revenue specific ad groups, keywords or even entire AdWords campaigns are generating.
Gain Comprehensive Customer Insights
Follow your customer’s journey through your website from start to finish. With the combined power of Salesforce and Google AdWords, you will have a complete overview of your marketing sales funnel, including: via which landing page visitors enter your website; what pages they visit; and where they exit, regardless of if a sale is made or not.
By integrating Salesforce with AdWords, you can see what’s working on your website and what isn’t. From there, you will be able to optimize your website for an engaging user experience. In turn, you will be enhancing the buying experience for your customers.
Convert Higher Quality Leads
With 360-degree insights about your visitors, you will gain a comprehensive insight into customer behavior. See which ads qualify the best leads and what information those leads look for on your website. You can gain valuable insight into:
- the different types of leads different ads bring in;
- discover AdWords that bring the best leads;
- bid on more expensive keywords with increased certainty that they will generate leads that convert.
In essence, you can focus on generating the highest value leads. There’s no sense in focusing on leads with a higher likelihood of leaving your website without making a purchase. Using the combined power of AdWords and Salesforce, you can see where your most valuable leads are coming from. You can also identify and focus on marketing channels that produce the most ROI.
Maximize ROI
Google AdWords and Salesforce help you know exactly where every dollar you spend goes. With the ability to analyze individual keywords, ad groups and entire campaigns, you can optimize your marketing spend and maximize ROI.
How to integrate Salesforce with Google AdWords
Below, we’ve provided you with a comprehensive guide on how to integrate Salesforce with Google AdWords. Before you start, however, you will need to perform some groundwork to ensure the process is smooth.
Before you start
- Make sure that you’re logged in as a System Administrator. This will give you the appropriate permissions to proceed with Google AdWords and Salesforce integration.
- Make sure that auto-tagging is enabled in your Google AdWords account. To do this:
- Login to your Google Ads account
- Select “All Campaigns” on the left-hand side of your screen
- Click on “Settings”
- Two tabs will appear along the top of the page. Select “Account Settings”
- Choose the “Auto-Tagging” option and click on the “Tag the URL that people click through from my ad” check box. Then, click “Save”.
- You will need permission to edit your website code.
- Ensure your Salesforce account allows you to create custom fields and enable field history tracking.
- You will need to have access to Salesforce’s web-to-lead feature, to send lead information from your website into Salesforce Leads object.
Now you’re good to go.
Step 1: Configure Salesforce
- Click the cog located on the top right-hand side of your screen. Then click “Setup”.
- Click “Object Manager” located along the horizontal bar. You should arrive at the following screen.
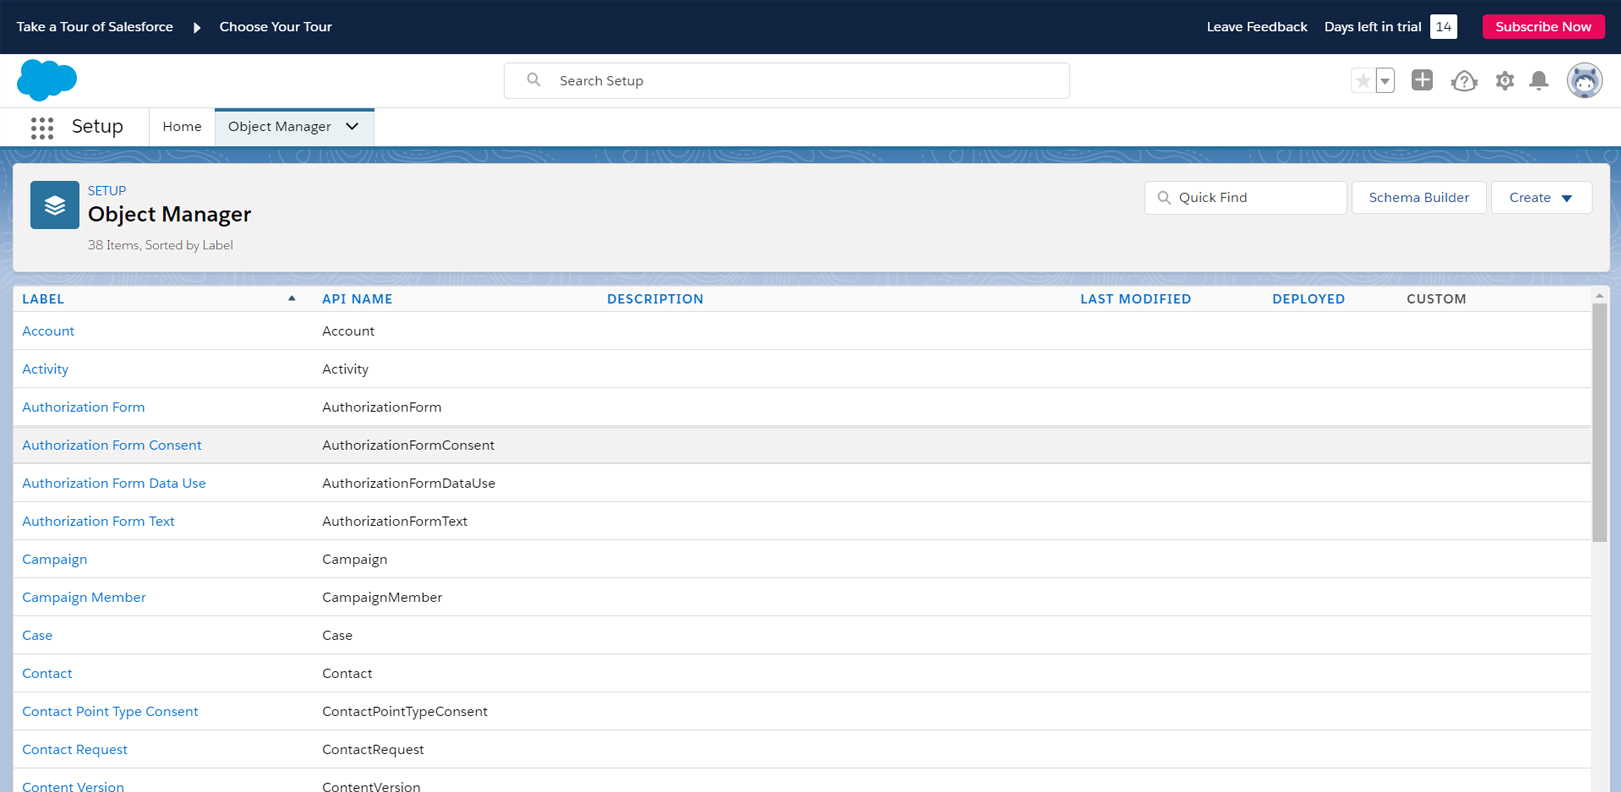
- Scroll down and click “Opportunity” then on “Fields and Relationships”, located on the left-hand sidebar.
- Click “New” then select “Text” and click “Next”.
- Enter the following parameters
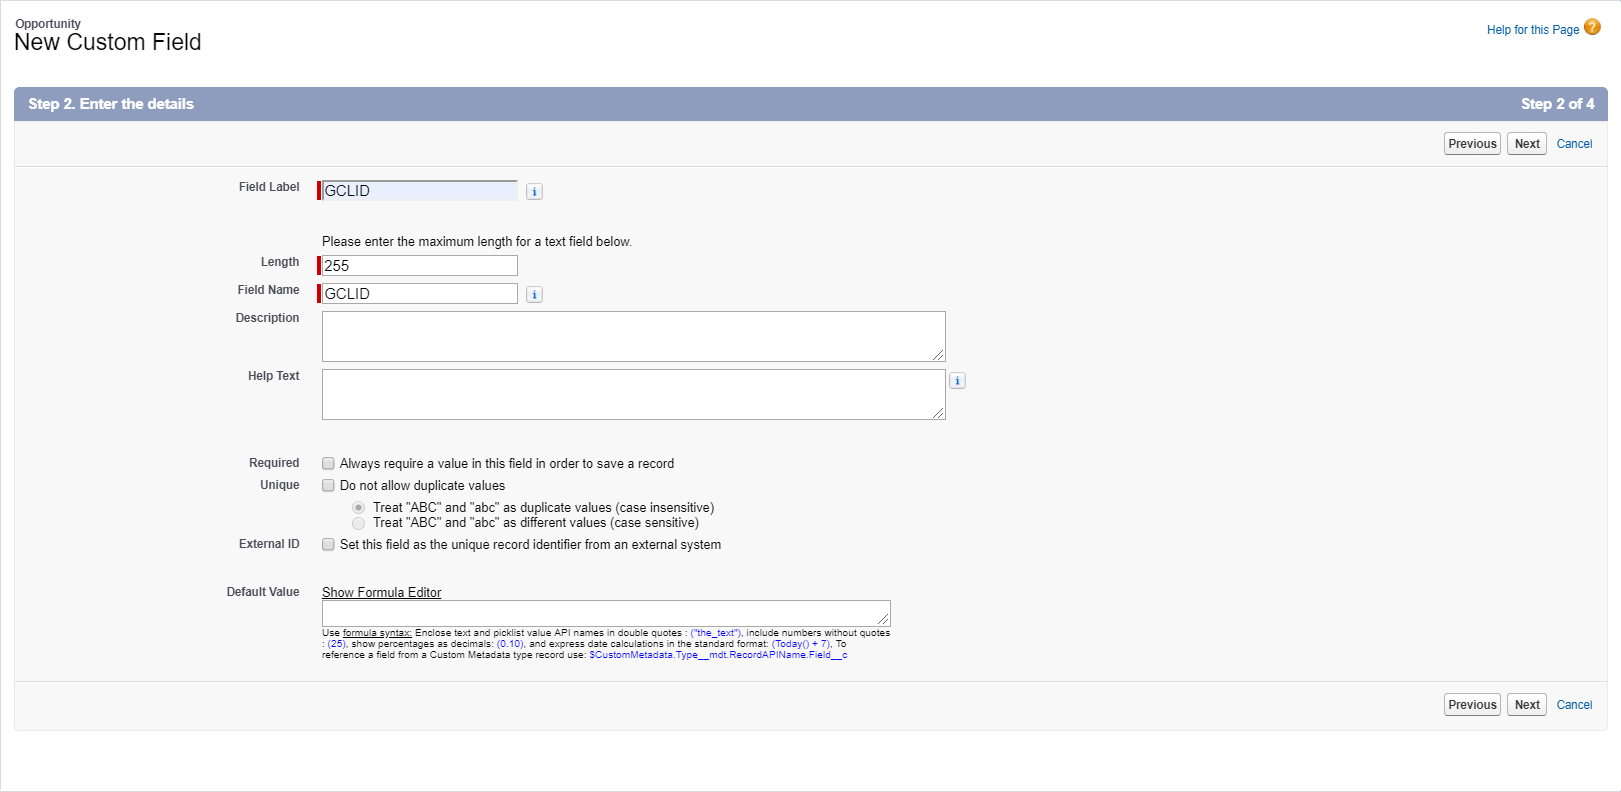
- Click “Next” and on the screen that follows click “Save”.
- Click “Set History Tracking”, located on the right. Then, select “Enable Opportunity Field History”. Finally, select the fields you wish to track and click “Save”.Note: You will repeat Step G for Accounts, Contacts and Leads as well. For more info visit the following officially help docs article Track Field History for Standard Objects
- Return to the “Object Manager” menu and click “Lead”. Repeat all of the above steps except for Step G.
Step 2: Website Configuration
During this next step, you will allow your website to save the Google Click ID (“GCLID”) as a cookie and then carry that value to your new GCLID Salesforce field. Copy and paste the following code into the header of your website.
|
1 2 3 4 5 6 7 8 9 10 11 12 13 14 15 16 17 18 19 |
<script type=”text/javascript”> function setCookie(name, value, days){ var date = new Date(); date.setTime(date.getTime() + (days*24*60*60*1000)); var expires = “; expires=” + date.toGMTString(); document.cookie = name + “=” + value + expires; } function getParam(p){ var match = RegExp(‘[?&]’ + p + ‘=([^&]*)’).exec(window.location.search); return match && decodeURIComponent(match[1].replace(/\+/g, ‘ ‘)); } var gclid = getParam(‘gclid’); if(gclid){ var gclsrc = getParam(‘gclsrc’); if(!gclsrc || gclsrc.indexOf(‘aw’) !== -1){ setCookie(‘gclid’, gclid, 90); } } </script> |
Tip: Instead of manually inputting the code to the header of each webpage, platforms such as WordPress have plugins that automatically apply the code to all website pages e.g. Insert Headers and Footers
Create Salesforce Web-to-lead form:
- Return to Salesforce, head to the web-to-lead section and setup your forms following the standard process.
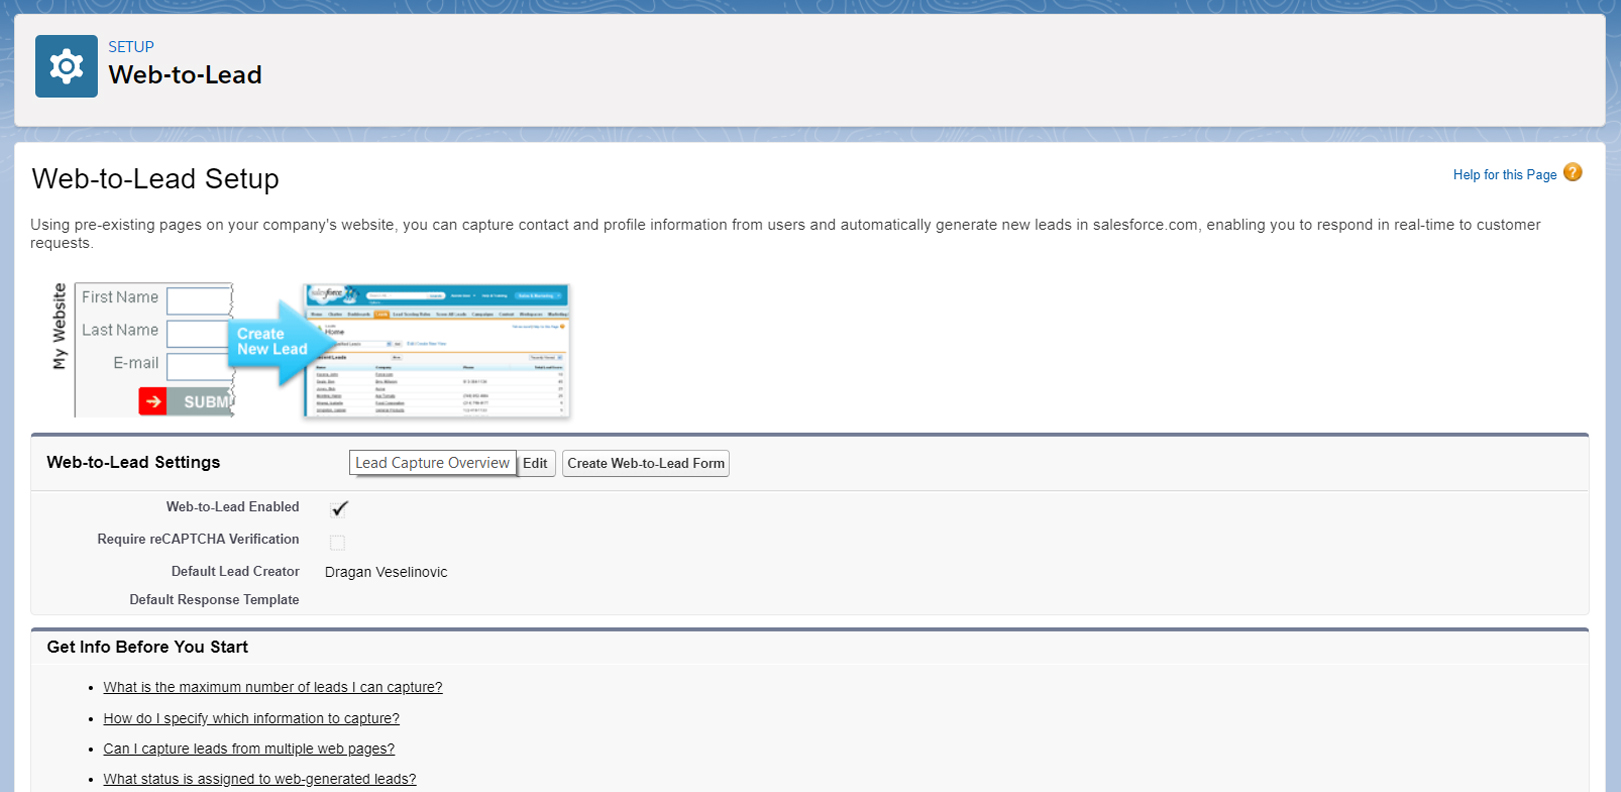 Tip: Type “web to lead” in the search bar located on the left-hand sidebar to access this section.
 - Ensure you include the GCLID lead field in the form.
- Search for the HTML code GCLID: and delete the maxlength and size tags.
- Edit the field type so it is “hidden” rather than “text.” This will make sure that the field does not show up on the form and is rather hidden from the website user.
- Copy and paste the following code between the FORM HTML tags i.e. <form>…</form> on your web forms<input id=”xxxx” name=”xxxx” type=”hidden” />
- Include the following code in the header of every webpage with a web-to-lead form.
|
1 2 3 4 5 6 7 8 9 10 |
<script> window.onload = function getGclid() { document.getElementById(“xxxx”).value = (name = new RegExp(‘(?:^|;\\s*)gclid=([^;]*)’).exec(document.cookie)) ? name.split(“,”)[1] : “”; } // window.onload() may not be supported by all browsers. // If you experience problems submitting the GCLID as a // hidden field, consider using an alternate method to // call this function on page load. </script> |
Note: When Salesforce generates the HTML code, it will include the ID and you will replace “xxxx” with that id.
Step 3: Configure Google AdWords
In this final step, it’s time to login to your account and setup AdWords conversion data to automatically import into Salesforce.
- In Google AdWords, click the “Settings” menu, located along the top right and then click “Linked Accounts”.
- Click “Details”, located under the Salesforce option.
- Click on “Link” and then follow the prompts in the popup window to login to your Salesforce account.
- You should arrive at the following screen.
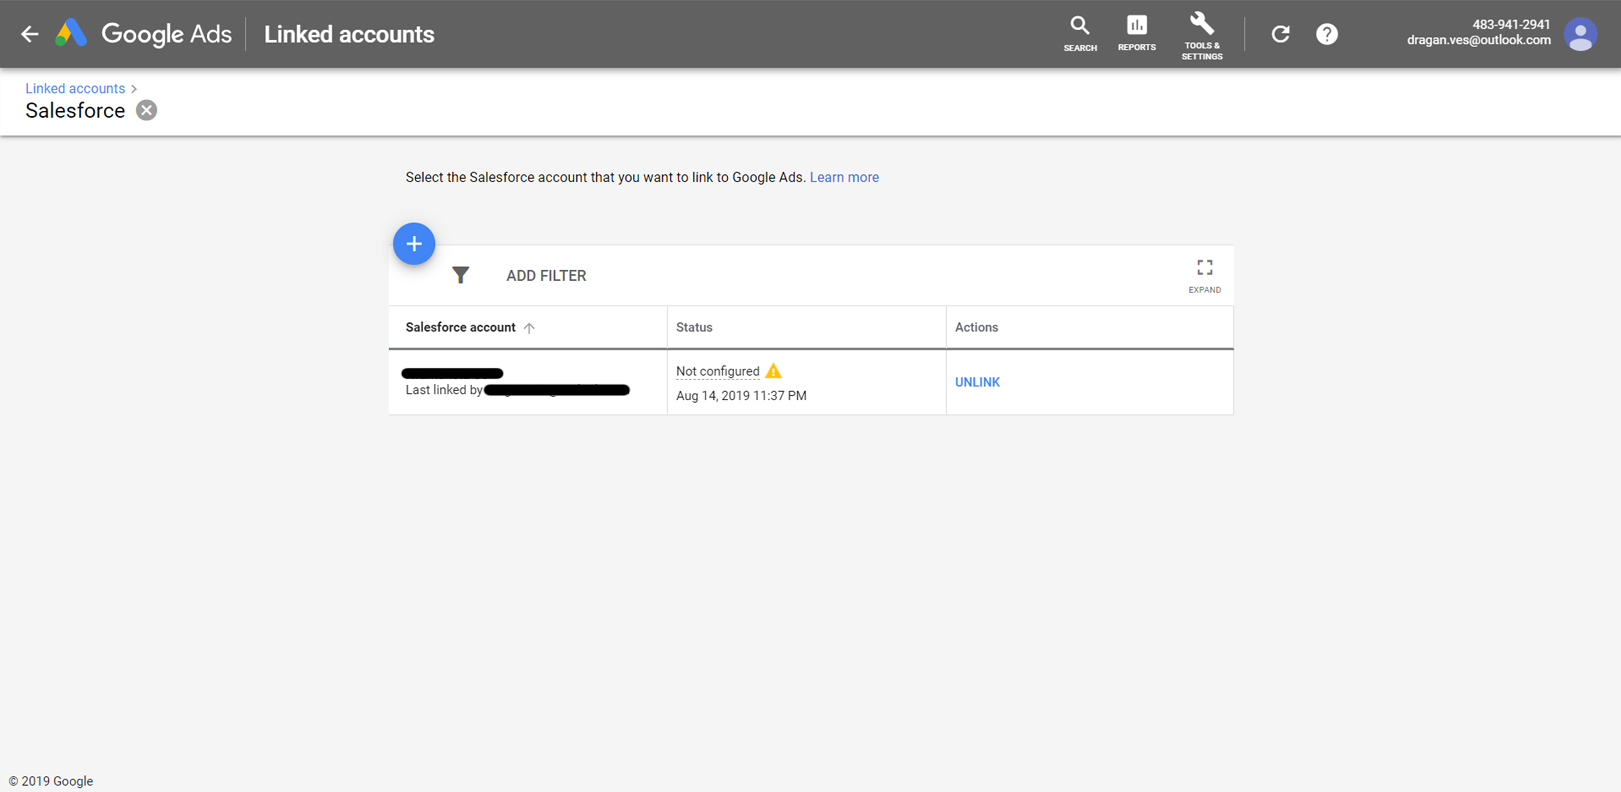
- Hover over the yellow warning sign and click “Configure”.
Setting Up Conversions
- The following screen should appear.
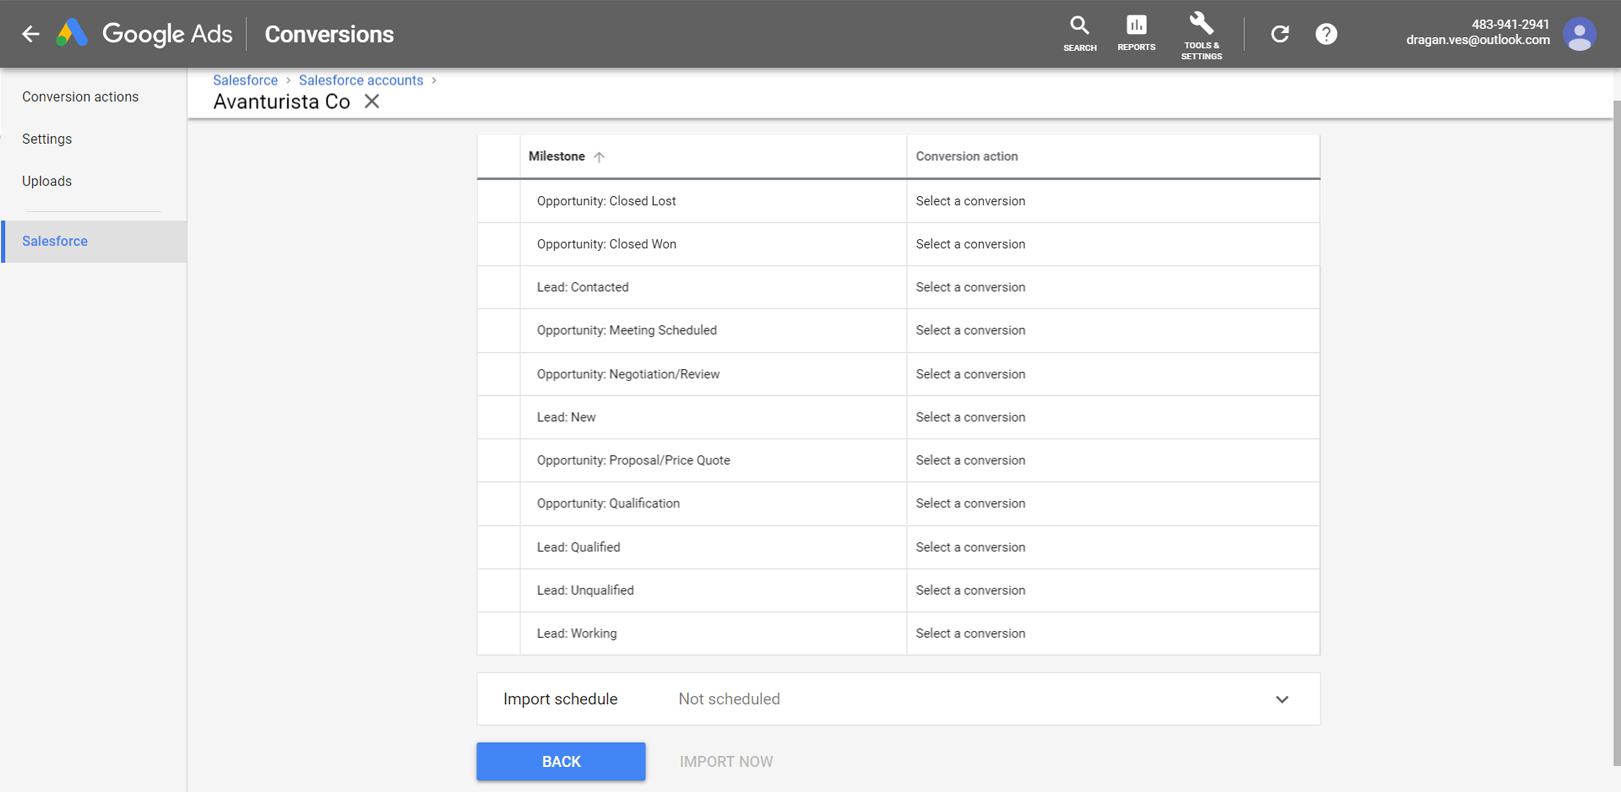
- Go to the “Conversion Action” column and “Create a conversion” and name it.
- Follow the prompts in the following screen i.e. “Select action you’d like to track?”.
- Click “Create and Continue”
- Click “Done”
You have now successfully setup Google AdWords conversion data import for Salesforce.
How to Also Track Conversions from Organic Search Facebook Ads, and More
Google Adwords conversion tracking is an amazing tool for tracking Adwords conversions, but what about other channels?
To understand how all of your marketing channels perform, we built GA Connector. GA Connector is a tool that integrates Salesforce and other CRMs with Google Analytics.
GA Connector allows you to see the source of each Salesforce Lead and Opportunity right in Salesforce. You’ll know whether a sale came from SEO, Facebook Ads, Adwords or any other channel:
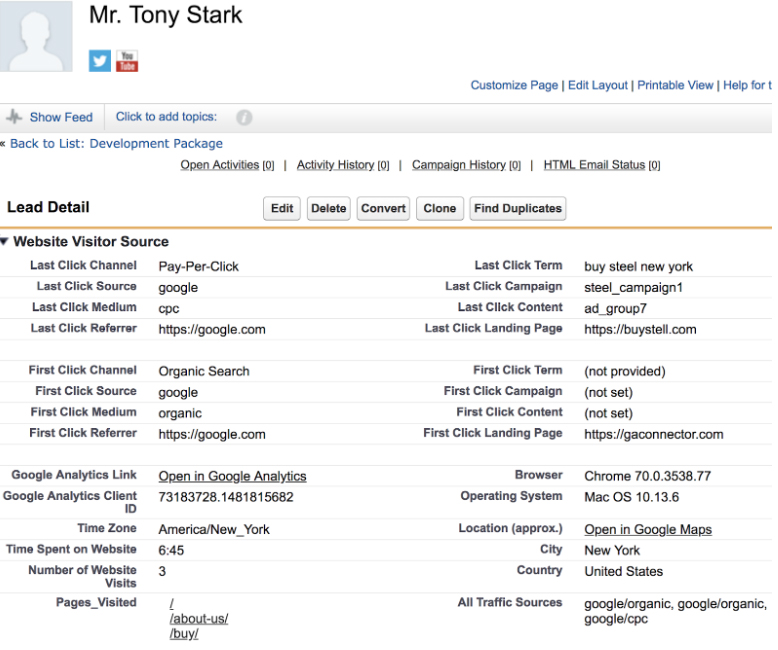
With this data, you can build powerful marketing ROI reports right inside Salesforce.
GA Connector also lets you import stats on closed deals from Salesforce to Google Analytics:
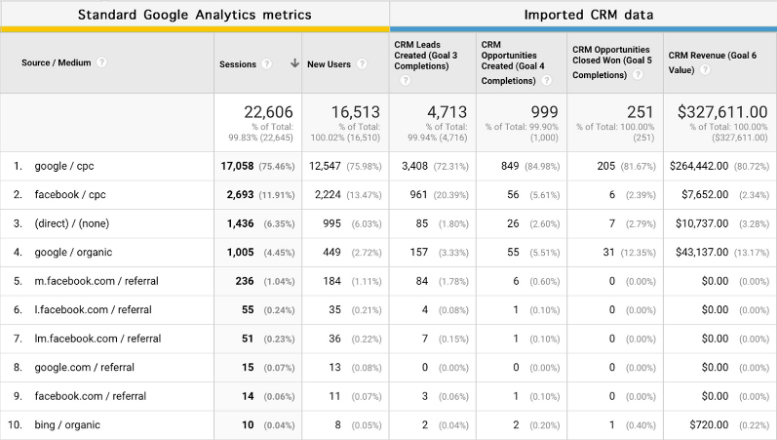
Allowing you to see deals closed by your sales team inside Google Analytics.
Sign up for GA Connector if you want to find out exactly where all of your sales are coming from.


